About the Author: Brad Walker is often referred to as the “Stretch Coach” and has even been called the Stretching Guru. Magazines such as Runners World, Bicycling, Triathlete, Swimming & Fitness, and Triathlon Sports have all featured his work. Amazon (author page) has listed his books on five Best-Seller lists. Google cites over 100,000 references to him and his work on the internet. And satisfied customers from 122 countries have sent 1,000’s of verified customer reviews. If you want to know about stretching, flexibility or sports injury management, Brad Walker is the go-to-guy.
Do your clients have problems with their Achilles?
With the London Marathon, alongside other marathon favourites, fast approaching, you may find more of your clients experiencing painful Achilles
Here’s stretch guru Brad Walker’s guide that your clients may appreciate for looking after this area.
Achilles Tendon Rupture and Tendonitis Treatment
Step-by-step treatment procedures for Achilles tendon rupture and Achilles tendonitis.
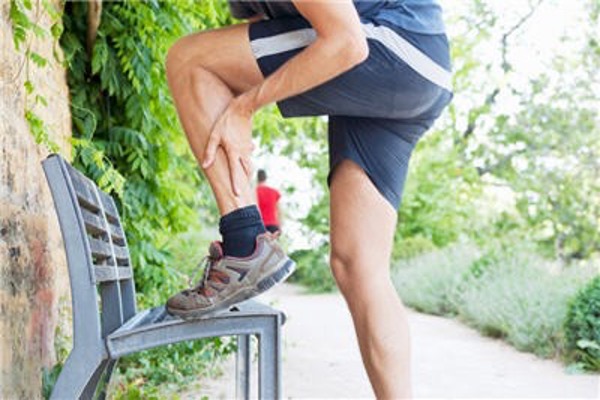
Achilles injury is commonly associated with sports that require a lot of running, jumping and change of direction. Excessive twisting or turning of the ankle and foot can result in inflammation, strain or a rupture.
Sports with the highest occurrence of Achilles tendonitis and Achilles tendon injury include running, walking, cycling, soccer, football, basketball and tennis.
What is an Achilles tendon Injury?
There are two main types of injuries that affect the Achilles tendon (or calcaneal tendon); Achilles Tendonitis and Achilles Tendon Rupture.
- Achilles Tendonitis (or tendinitis) is simply an inflammation of the tendon, and in most cases is caused by excessive training over an extended period of time without adequate rest.
- Achilles Tendon Rupture, on the other hand, is a tear, strain or complete snapping of the tendon, and usually occurs as the result of a sudden or unexpected force. In the case of a complete rupture, the only treatment available is to surgically repair the rupture and place the lower leg in a plaster cast for 6 to 8 weeks.
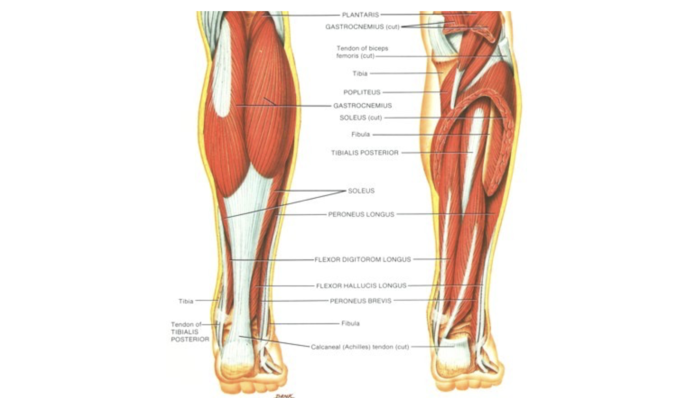
Muscle Anatomy of the Achilles tendon
The Achilles tendon (or calcaneal tendon) is located at the rear (posterior) of the bottom half of the lower leg. In the diagram it is represented by the thick band of connective fibre that runs from the bottom of the Gastrocnemius muscle to the heel bone.
The Achilles tendon is used to plantar flex the foot, or point the foot and toes downward. This allows a person the run, jump and stand on one’s toes.
The Achilles tendon is the strongest tendon of the body, and able to withstand a 1,000 pound force without tearing. Despite this, the Achilles tendon ruptures more frequently than any other tendon because of the tremendous pressures placed on it during competitive sports.
Causes and Risk Factors
There are a number of causes and risk factors associated with Achilles tendonitis and Achilles tendon rupture. One of the most common causes is simply a lack of conditioning. If the tendon, and muscles that connect to the tendon, have not been trained or conditioned, this can lead to a weakness that may result in an Achilles injury.
Overtraining is also associated with Achilles tendonitis. Doing too much, too soon places excessive strain on the Achilles tendon and doesn’t allow the tendon enough time to recovery properly. Over time small tears and general degeneration result in a weakening of the tendon, which leads to inflammation, pain and a possible strain or rupture.
Other causes of Achilles injury include a lack of warming up and stretching. Wearing inadequate footwear, running or training on uneven ground, and simply standing on, or in something you’re not meant to (accident). Biomechanical problems such as high arched feet, flat feet, pronation and supination can also lead to Achilles injuries.
Preventing Achilles Tendonitis
So what are some of the things you can do to help prevent Achilles tendonitis and Achilles tendon rupture?
- Warm-Up properly: A good warm-up is essential in getting the body ready for any activity. A well-structured warm-up will prepare your heart, lungs, muscles, joints and your mind for strenuous activity.
- Stretch and Strengthen: I’ll cover these in a lot more detail a little later on when I discuss rehabilitation and conditioning exercises.
- Balancing Exercises: Any activity that challenges your ability to balance, and keep your balance, will help what’s called proprioception: – your body’s ability to know where its limbs are at any given time.
- Plyometric Training: Plyometric drills include jumping, skipping, bounding, and hopping type activities. These explosive types of exercises help to condition and prepare the muscles, tendons and ligaments in the lower leg and ankle joint.
- Footwear: Be aware of the importance of good footwear. A good pair of shoes will help to keep your ankles stable, provide adequate cushioning, and support your foot and lower leg during the running or walking motion.
- Cool Down properly: Just as important as warming up, a proper cool down will not only help speed recovery, but gives your body time to make the transition from exercise to rest.
- Rest: As most cases of Achilles tendonitis are caused by overuse, rest is probably the single biggest factor in preventing Achilles injury. Avoid over training; get plenty of rest; and prevent Achilles tendonitis.
Immediate Treatment (48 to 72 hours)
The immediate treatment of an Achilles tendon injury is vital. Proper care and treatment now will go a long way towards a full recovery later.
Without a doubt, the most effective, initial treatment for Achilles tendon rupture and tendonitis is the R.I.C.E.R. regimen. This involves the application of (R) rest, (I) ice, (C) compression, (E) elevation and obtaining a (R) referral for appropriate medical treatment.
Where the R.I.C.E.R. regimen has been used immediately after the occurrence of an injury, it has been shown to significantly reduce recovery time. R.I.C.E.R. forms the first, and perhaps most important stage of injury rehabilitation, providing the early base for the complete recovery of injury.
When an Achilles injury occurs and the tendon has been damaged there is a large amount of uncontrolled bleeding around the injury site. This excessive bleeding causes swelling, which puts pressure on nerve endings and results in increased pain. It is exactly this process of bleeding, swelling and pain that the R.I.C.E.R. regimen will help to alleviate.
After the first 48 to 72 hours
So what happens after the first 48 to 72 hours? Let’s first take a quick look at how damaged tendons repair themselves.
When any damage occurs to the soft tissue (muscles, tendons, ligaments), the body immediately goes into a process of repair. Where the individual fibres have been ruptures, or torn, the body begins to bind the damaged fibres together using a fibrous protein called collagen. Or, as it’s more commonly known, scar tissue! When a tendon is torn or strained, you would expect that the body would repair that damage with new tendon. In reality, this doesn’t happen. The tear or rupture, is repaired with scar tissue. So, how do you get rid of that annoying formation of scar tissue?
- Firstly, you must keep active. Don’t listen to anyone who tells you to do nothing. Now is the time to start active rehabilitation. Most of the swelling will have subsided after the first 48 to 72 hours and you are now ready to start light activity.
- Secondly, to remove most of the unwanted scar tissue, you now need to start two vital treatments: Heat and Massage. The Achilles tendon receive very little blood supply, as compared to a muscle for example. So it’s vitally important to increase the blood flow to the injured area. Heat and massage will help supply the tendon with the oxygen and nutrients it needs for a speedy recovery.
Just a few final points before we move on. Be sure to drink plenty of fluid during your injury rehabilitation. The extra fluid will help to flush a lot of the waste products from your body.
You’re not done yet!
If you’ve followed the advice so far, you’ve come over 80% of the way. You may even feel that your Achilles is fully recovered. Your treatment so far may have stopped the swelling and bleeding, and it may have reduced the amount of scar tissue in the Achilles and calf muscles.
However, fixing your Achilles tendon rupture or tendonitis is as much about treating the condition as it is about preventing it from re-occurring. If you’ve ever suffered from any sporting injury in the past, you’ll know how annoying it is to think you’re recovered, and then out-of-the-blue, you’re injured again and back to where you started. It can be one of the most frustrating and heart-breaking cycles an athlete, or anyone else for that matter, can go through.
Active Rehabilitation
Most people will refer to this phase of your recovery as the active rehabilitation phase, because during this phase you will be responsible for the rehabilitation process. You will be doing the exercises and activities required to speed up your full recovery.
The aim of this phase of your rehabilitation is to regain all the fitness components that were lost because of the injury. Regaining your flexibility, strength, power, muscular endurance, balance, and co-ordination will be the primary focus. Without this phase of your rehabilitation there is no hope of completely and permanently making a full recovery.
The first point to make clear is how important it is to keep active. Often, the advice from doctors and similar medical personnel will simply be; rest. This can be one of the worst things you can do. Without some form of activity, the injured area will not receive the blood flow it requires for recovery. An active circulation will provide both the oxygen and nutrients needed for the injury to heal.
Warning: Never, never do any activity that hurts your Achilles. Of course you may feel some discomfort, but never push yourself to the point where you’re feeling pain. Be very careful with any activity you do. Pain is the warning sign; don’t ignore it. One of the worst things you can do is start this phase of your rehabilitation too early.
Please note: The order of the exercises listed below is very important. The exercises start with gentle easy movements and progress to intense dynamic exercises. Please start with the range of motion exercises listed below and only move onto the next set of exercises when these can be performed pain free.
1. Range of Motion Exercises
Regaining a full range of motion of your Achilles, ankle joint and lower leg is the first priority. A full range of motion is extremely important, as it lays the foundation for more intense and challenging exercises later in the active rehabilitation process.
As you work through the initial stages of recovery and your Achilles begins to heal, start to introduce some very gentle movements. First bending and straightening your ankle, then as you get more comfortable with this simple movement, start to incorporate some rotation exercises. Turn your ankle from side to side, and rotate clockwise and anti-clockwise.
When you feel comfortable with these range of motion exercises and can perform them relatively pain free, it’s time to move onto the next phase of the active rehabilitation process.
2. Strength Exercises
Now it’s time to add some intensity to the range of motion exercises. The aim here is to gradually re-introduce some strength back into the injured muscles, ligaments and tendons.
When attempting to increase the strength of your Achilles, be sure to approach this in a gradual, systematic way of lightly over-loading the muscles and tendons. Be careful not to over-do this type of training. Patience is required.
An effective and relatively safe way to start with isometric exercises. These are exercise where the ankle joint itself does not move, yet force is applied and the calf muscles and Achilles are contracted.
For example: imagine sitting in a chair while facing a wall and then placing the ball of your foot against the wall. In this position you can push against the wall with your foot and at the same time keep your ankle joint from moving. The muscles contract but the ankle joint does not move. This is an isometric exercise. This can be used to strengthen the Achilles and ankle joint in all directions. Pushing your foot to the left or right against something immovable, and pushing down (as above) and pulling up.
3. Stretching Exercises
“Poor dorsiflexion ROM (ankle flexibility) was associated with 2.5 times the risk of lower limb injuries compared with average dorsiflexion ROM and 8 times the risk compared with people with a high level of flexibility.”
- Gabbe, B. Finch, C. Wajswelner, H. Bennell, K. (2004) Predictors of Lower Extremity Injuries at the Community Level of Australian Football. Clinical Journal of Sport Medicine, 14(2):56-63.
- Pope, R. Herbert, R. Kirwan, J. (1998) Effects of Ankle Dorsiflexion Range and Pre-Exercise Calf Muscle Stretching on Injury Risk in Army Recruits. Australian Journal of Physiotherapy, 44(3):165-172.
It’s also important at this stage to introduce some gentle Achilles and calf stretches. These will help to further increase your range of motion and prepare your Achilles for more strenuous activity to come. While working on increasing the flexibility of your Achilles, it’s also important to increase the flexibility of the muscle groups around the injured area. These include the calf muscles and the anterior muscles of your shin (anatomical names listed below).
- Gastrocnemius
- Soleus
- Tibialis Posterior
- Flexor Hallucis Longus
- Flexor Digitorum Longus
- Peroneus Longus and Brevis
- Plantaris
4. Balance and Proprioception Exercises
This phase of the rehabilitation process is often overlooked and is one of the main reasons why old injuries keep re-occurring. Once you feel some strength returning to your Achilles it’s time to incorporate some balancing drills and exercises.
When muscles and tendons are torn, nerves are also damaged. These nerves send vital information to the brain about the specific position and location of the Achilles tendon and ankle joint in relation to the rest of your body. Without this information the muscles, tendons and ligaments are constantly second-guessing the position of the Achilles and ankle joint. This lack of awareness about the position of the lower leg can lead to a re-occurrence of the same injury long after you thought it had completely healed.
Balancing exercises are important to help re-train the damaged nerves around your lower leg and ankle joint. Start with simple balancing exercises like walking along a straight line, or balancing on a beam. Progress to one-leg exercises like balancing on one foot, and then try the same exercises with your eyes closed. When you’re comfortable with the above activities, try some of the more advanced exercises like wobble or rocker boards, Swiss balls, stability cushions and foam rollers.
5. Plyometrics and Sports Specific Exercises
This last part of the rehabilitation process will aim to return your Achilles to a pre-injury state. By the end of this process your Achilles tendon should be as strong, if not stronger, than it was before you injured it.
This is the time to incorporate some dynamic or explosive exercises to really strengthen up your Achilles tendon and improve your proprioception. Start by working through all the exercises you did above, but with more intensity. For example, if you were using light isometric exercises to help strengthen your Achilles and calf muscles, start to apply more force, or start to use some weighted exercises.
From here, gradually incorporate some more intense exercises. Exercises that relate specifically to your chosen sport are a good place to start. Things like skill drills and training exercises are a great way to gauge your fitness level and the strength of your Achilles and lower leg.
To put the finishing touches on your Achilles rehabilitation, I always like to do a few plyometric drills. Plyometric exercises are explosive exercises that both lengthen and contract a muscle at the same time. These are called eccentric muscle contractions and involve activities like jumping, hoping, skipping and bounding. These activities are quite intense, so remember to always start off easy and gradually apply more and more force. Don’t get too excited and over-do-it, you’ve come too far to do something silly and re-injure your Achilles.
Email: contact@stretchcoach.com
Website: https://stretchcoach.com/
To grab a copy of Brad’s Ultimate guide to stretching and flexibility, go here:
https://stretchcoach.com/products/stretching-handbook-and-dvd/